In EASI'R, fields are categorised by B2B Contact fields, B2C Contact fields, B2B Account fields, B2C Account fields, Product fields, and Team fields. All those sections (except team fields and vehicle fields) already contain pre-existing fields, which are stored in the section 'Additional information' until they have been added to a field group.
Admin users have the possibility to create additional custom fields and groups. These groups can contain the custom fields created by the Admin, but also the already existing fields.
Create group/field
- Click on your user name and then on 'Settings' --> 'Field management'.
- Click the section you want to edit.
- In order to create a new field, there needs to be a group. You can not add fields to the pre-existing group 'Additional information'.
- Click 'New group' --> Enter name --> Click 'Create group'.
- Now you can add existing fields from 'Additional Information' to this group:
- Open 'Additional information' and click 'Edit' next to the field you want to move.
- Under 'Field group', choose the group you want this field to be moved to.
- Click 'Save field'.
- Please be aware that once a field has been moved out of 'Additional information', it can never be put back!
- Fields can also be moved by drag-and-drop.
- Instead of adding an existing field to your group, you can also create a new field:
- Click 'New field' in the top right corner.
- Name the field and add a description (optional).
- Decide if the field shall be visible or not.
- Now you can add the field to a group that you have created. Please note that you cannot add fields to the pre-existing group 'Additional information'!
- Decide on the field type: text, numeric, date, multiline free text, single choice, multiple choice, or boolean:

- For fields of type 'Text', you can add a field validation: Email or URL. If you choose one of those, EASI'R makes sure that the content entered into this field is in fact an email or URL respectively. Please be aware that you cannot change field type or field validation after the field has been created!
- Click 'Create field'.
-
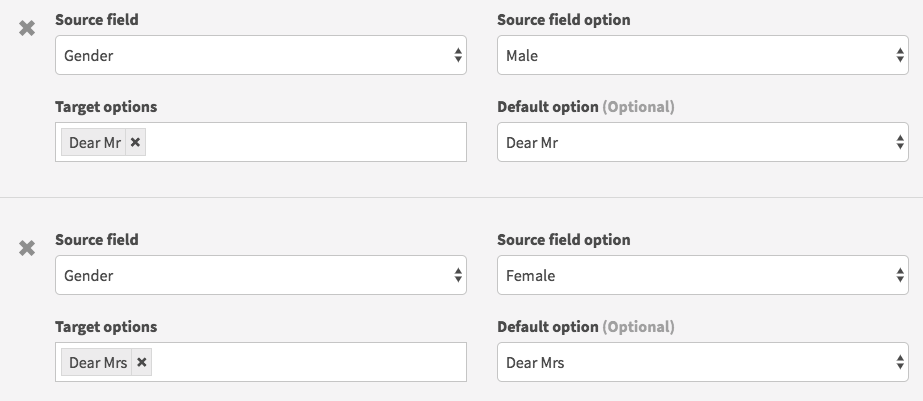
Fields of type 'Single choice' and 'Multiple choice' can be linked. This can be used for example to automatically select the salutation 'Mr.', when Gender 'Male' has been selected.
- Click 'Set links' in order to create a link

- Connect source field and target option

- Click 'Save'
- In our example, we added the above fields and links to 'B2B Contact fields'. This is how this will look now when a B2B Contact is created: As soon as 'Male' is selected, the Salutation 'Dear Mr' is automatically chosen. If 'Female' is chosen, 'Dear Mrs' will be added.

Edit group/field
- You can change the order of fields or groups by drag-and-drop
- You can drag-and-drop a field into another group
- Click 'Edit' next to the group name to edit the group
- In order to edit a field, open the group by clicking '
'. Click 'Edit' next to the field you want to edit. Again, you can not change the field type or field validation. You can however hide or delete a field (fixed fields cannot be deleted)
- You can only delete empty groups. You therefore first need to move all field into other groups, or delete the respective fields.
Attention: Please be aware that deleting a field will also delete all the information that was saved for this field!